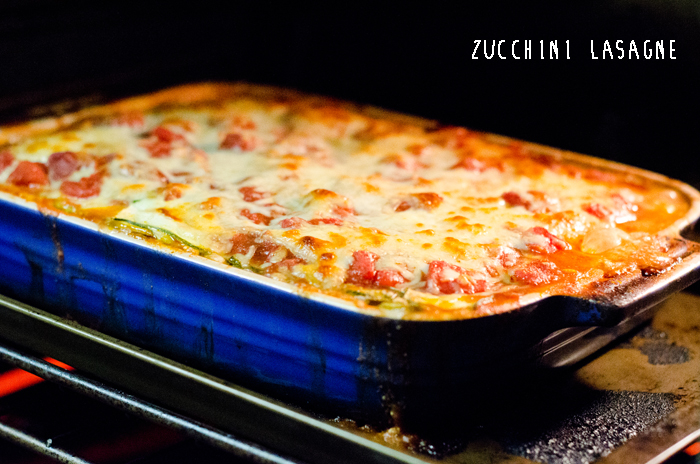
Zucchini Lasagne | Gluten Free

I love lasagne.  It’s bubbly cheesy goodness, it’s wonderfully savory sauce and all of its hearty comfort. Italian food feels very comforting to me.  When I was sick, my Dad would always make me pastina with butter and cheese or lentil soup with pasta shells.  My Italian grandmother is also a mean cook!  Her lasagne actually has meatballs inside of it.  Does that sound amazing?  Yup.  Yup, it is.

Ever since becoming gluten free, I have not had this wonderful dish.  I couldn’t find the motivation to create it with rice or corn or quinoa noodles.  I felt like it would be a disappointment, and might turn out to be the mushy counterpart to my Grandmother’s lasagne.  Don’t get me wrong, I do indulge in gluten free pasta now and then, and it can be quite tasty, but it can also be finicky and unfriendly.

During the spring months I would grate up zucchini and turn them into noodles by sauteing them quickly and then slathering them with homemade pesto.  They were always delicious, as well as healthy.  It is the easiest way to scarf down a couple large veggies in one sitting.

So, I started to think why not use it to create a lasagne?  All I needed to do was to shave the zucchini with a mandolin to make long lasagne like noodles.  BAM!

Then I started on my meat sauce.  I saute’d garlic and finely chopped onions in some olive oil, and once they were nicely cooked down added a pound of pasture-raised ground beef.  I browned the meat and added two cans of  Tuscan-style tomato sauce.  Now, the key to any tomato sauce in my book is red wine.  Lots of it.  I don’t like my sauce to be sweet and love the rich savory taste you get from the red wine.  Now, I love a meat sauce.  I love meat in general. But, I am sure this dish would be equally good made vegetarian.  Make your tomato sauce how you like and to your specifications—or you can follow me down my beefy wine laden path, because it is delicious.

After your sauce is done simmering, lay some down in your lasagne pan.  Layer up your pan.  Sauce, zucchini, ricotta, mozzarella. You want to end with a layer of sauce and mozzarella on top.

Pop it in the oven… lay back and watch the magic happen. It was so good my husband and I ate it for the next three meals.  I am a firm believer in leftover Italian food for breakfast.


Ingredients: 

1 lb of ground beef

2 cans (or jars) of your favorite tomato sauce.  Homemade would be even better

6 medium-sized zucchinis, sliced 1/8 inch thick with a mandoline

1 egg

150z ricotta cheese

1 bag of shredded mozzarella cheese

Red wine, to taste

Olive oil, to coat the pan

Minced garlic

1/4 cup parmesan cheese

Salt and pepper

Preheat your oven to 350 degrees.

Take out your large saucepan and coat it in a very thin layer of olive oil.  Saute your garlic.  Add in your beef.  Season it to your liking and let it brown.  I usually add salt, pepper and granulated garlic to mine.

Once your beef is cooked through, add in your sauce and stir.  Add in your wine.  I usually just measure mine by feel… but, I am thinking it would be at least a 1/2 a cup.

Let your sauce simmer as you prepare your other ingredients.  I like to let mine simmer for 30 minutes or so.  It makes all the flavors come together beautifully.

Slice your zucchini with a mandolin approximately 1/8 thick.  Cut it lengthwise so the slices are nice and long to mimic the shape of noodles.

In a separate bowl, prepare your ricotta cheese mixture.  Add in your ricotta and your egg.  Mix together well until the egg is fully combined into your ricotta.

Now, you can begin to layer your lasagne!

In your 9×12 baking pan, begin the layering process by putting down a thin layer of sauce.  After that zucchini, ricotta and mozzarella   Repeat this process until all of your ingredients are used up.  Top it off with a layer of sauce and then mozzarella.  Sprinkle your parmesean on top.

Cover with tin foil, and pop into the oven for 45 minutes.

Remove the tin foil and bake it uncovered for an additional 10-15 minutes, or until the cheese starts to brown and get bubbly.

Once it’s done, let it rest for 10-15 minutes before serving.

Dig in.  Eat for two days straight.  No regrets.

(Inspired by Skinny Taste)


Homebody Halloween | Cinnamon Sugar Pumpkin Seeds

Happy Halloween,  Human Friends, Bear Friends, Ghoul Friends and Everyone in between!

Admittedly, this year I have been a bit of a Halloween bummer.  It completely snuck up on me.  There was no costume planning.  There was no party planning.  I wasn’t one of the people that put out spooky spider webs or cardboard graveyards on their lawn.  There was, however, some long pauses made in a very well stocked candy aisle at Target. Oh, and some lingering on Etsy for pet costumes. Nothing was purchased (biggest Halloween regret?  Yup.) That is about as far as I went this year.

The whole fact that Halloween can sneak up on you is such a grown-up notion.  Do you remember when you were a kid?  As soon as you had emptied your pillowcase full of candy and strategically hidden all of the snickers bars  from your father’s sticky fingers, you had already come up with next years costume.  It was never a hassle (for us kids at least… I can’t speak for my Mother and Grandmother who would sew most of my costumes.  Thank you, ladies.) It was always fun and always joyous and always meant free candy.

See that kid? (Me.)  Getting caught red handed in the act of eating candy when her father was trying to give her a bottle.  A face full of sweat smeared clown make-up from hitting the mean streets so hard with her candy bag.  She knew what was up.  Life was easier.

This year, after brooding in my Halloween grumpy pants, I decided to just go small and have a nice little pumpkin carving party for two.  The husband and me.  (admittedly, it turned into three.  Emma tried to eat all the pumpkin guts.  She also made out with my jack o’lantern.  She is kind of easy.)  We carved, we laughed, we made some pumpkin seeds.  It was good. It made me realize that you don’t have to go big and crazy to get into the spirit.

I hope you enjoy our video.  A little peek into our humble Halloween with a side of stop motion.  Our wonderful and talented friends Ampersand allowed us to use their song to jazz it up a bit.  You can find them at their website here.  Give them a visit and a listen.

Here is a recipe for our Cinnamon Sugar Pumpkin Seeds.  Granted, I will tell you now… It was late, things didn’t get measured and it turned out okay.  I advise you, like I did, to just get a little sloppy with it.  Be creative.   I believe in you.  Throw away the measurements.  The kitchen is your canvas.  They turned out tasty.  I only burnt them a little on the edges of the pan.  Not everyone is perfect, ya know?

Ingredients:

2 tbs of butter, melted (this is a gross approximation.  Perhaps a “chunk” would be a more proper measurement)

1/4 cup of sugar

Cinnamon ( lots of it.)

A splash of vanilla extract

Scoop, clean and prep your seeds.  After washing them, let them dry for a bit on a plate with paper towels.

Preheat your oven to 350 degrees

After your seeds are dry,  add them to a mixing bowl.  Add in your butter, sugar, cinnamon and vanilla.  Mix it all up until your seeds are coated all the way through.  Line a pan with parchment paper.  Spread out your seeds evenly onto the parchment paper.  Put your seeds in the oven.  Check them every 10 minutes  and give them a bit of a stir so they cook evenly. Do not let them go too long because you are editing a Halloween video.  They will burn.  Pumpkin seeds wait for no one.

Have a wonderful Halloween!

Cheesy Cauliflower Bake

 When the seasons start to change, and the weather starts to shift, I find myself going into hibernation mode. I nest. I start to do things like organize weird, neglected cabinets in the house and bake pumpkin scones. I want to be comfortable and warm and cozy.  I want to stuff my face with cheese and starch.  I want to break out my husbands over-sized, fleece sweatpants and make them acceptable to wear in public.  Let’s redefine sexy.  Right? This probably won’t happen, but I am still hoping.  Hey, Pajama Jeans happened, and no one saw that coming.  There’s  a chance.

I am off topic.

I have gathered you all here to talk about cauliflower. The magical food that masquerades its healthy properties by acting like a delicious, creamy, potato-y, dirty, hip hugging, thigh expanding crazy carbohydrate. It is sneaky delicious. It’s also packed full of vitamins and cancer fighting goodness!  Yup.  It’s fancy.

What I have created for you here was inspired by a flurry of Pinterest posts that had the words “FULLY LOADED BAKED POTATO” in them. Usually all in caps. Enthusiastically jumping off the page. I received the message loud and clear. Yes, that looks delicious.  Yes, I would like to fully load a baked potato straight into my face.  However, why not try to skinny it up a bit?  Let’s give it a try, right? I also added lots of rainbow chard into the mix.   I did what I could to make this dish something I wouldn’t have to feel super guilty for eating. I didn’t want to get a case of those weird “I shouldn’t have eaten that” sads. To my delight, it worked out beautifully! I may or may not have actually eaten our leftovers for breakfast.  Yum.

Let me talk you through it.

Ingredients:

1 head of cauliflower

1/2 cup sour-cream (I used light sour cream, but that is no matter. I assume regular would only make it more delicious.)

1/4 cup freshly grated parmesan cheese

3/4 cup sharp cheddar cheese (plus a handful more to sprinkle on the top.)

1 cup chopped green onions

1 whole bunch of rainbow chard (you can substitute whatever dark leafy green you like best. Kale and spinach would both be delicious.)

1 small package of bacon (8 pieces or so)

Olive oil for sauteing your greens

1/4 cup of chicken broth for your greens

Salt

First things first.  Time to cook your bacon.  I cooked mine in the oven following these directions. 

Once your bacon is cooked and cooling…

Preheat your oven to 350 degrees.

Cut up your cauliflower.  Remove the stem and cut it into smaller pieces.

Place the cauliflower into a large pot of  salted boiling water and cook until tender (10 mins or so).

Get a skillet going over medium heat.  Add enough oil to gently coat the pan.  Add in your greens.  Add in your chicken broth.  Saute the greens until they are gently wilted but still tender.  Set aside.

While your cauliflower is cooking, dice up your onions, shred your cheeses and measure out your sour cream.  Dice up your crispy bacon into tiny bite sized pieces.

Once your cauliflower  has reached its desired tenderness, drain it well.

Once it’s drained, put the cauliflower into a large mixing bowl and mash it up with a potato masher.   At this time, add in your sour cream, parmesan, green onions and cheddar cheese.   Fold in your greens. Mix it together until it’s distributed evenly. Fold in your bacon pieces reserving about a 1/4 cup for the top of your dish.

Grease up your baking dish.  I used a cast iron pie dish.

Add the mixture and pack it into the dish.  Sprinkle cheddar cheese and bacon on top.

Pop it into the over for 30-35 minutes.  You will know it is done when the cheese starts to brown and bubble.  Cheesy delicious.

Let it cool for 10 minutes before serving.

After that, all bets are off.


The Graduate

Yesterday was a momentous day in our household. Our five month old Golden Retriever, Emma, graduated from her  ”Beginning Puppy” class. I am pretty sure that this was the puppy class equivalent of an alternative, laid-back preschool. The kind of school where you let the kids make the rules and it’s acceptable to  steal the other kids toys because “that’s just the breed.”

Could you imagine if it was like that in real human kid school?  Your kid does something naughty and then they are asked by the teacher  ”Wait…what’s your nationality again?  Ooooh…”  I think that would be called discrimination.  However, in the puppy world these things fly. Dogs are held to a whole other standard than humans. It’s a lax life.

We were asked by the instructor on day one of our early morning puppy class  ”So, what kind of problems are you all experiencing?”  I  expressed the concern that our dog was too smart for her own furry britches. She anticipates when something is about to happen that she isn’t a fan of (ie. going to her crate, going outside when her humans are inside…etc) and she will run the other way.  We were told by the instructor that “It is VERY rare for dogs to be openly disobedient.”  Uh oh. I looked around at all of the other dogs with their owners.  There was one black dog about Emma’s size that never EVER stopped looking at its owner. Sitting perfectly at attention, waiting for instruction.  I looked at Emma.  She was trying to choke herself out on the leash while barking and slobbering. Of course.  Granted, the woman with the well behaved dog was wearing a very serious fanny pack full of treats. Maybe this was the holy grail of dog training secrets!  The next session I showed up holstered up with a fanny pack full of treats.  This did prove to make things more motivational, but like people dogs have different personalities.  If that well behaved black dog was the high school Mathalete, Emma would be the kid  who is slightly hyperactive and excels in things like finger painting and exuberant dance!  I accept her.  We all have different gifts.   So what if hers is charisma?

After her final class, in a fit of joy and pride, I decided that I wanted to lift up my baby and have a picture taken.  I also learned that I do not have the upper body strength to lift forty pounds of Retriever without pulling out my back.  Whoops.  Lift from the knees.

It’s hard to remember that you need to brace yourself when she looked like this just three short months ago:

Anyway, she did it.  She is a graduate.  She has a very pedestrian looking diploma that has  her name written in with a Sharpie. She learned some life lessons in the process. Growing up is hard.

If Emma had the thumbs or the language to write out a list of what she learned, I think it would go something like this:

EMMA’S LIST

Some dogs want to be humped.  Some dogs do not.  Either way, I will hump them.  Preferably their face.  It doesn’t even HAVE to have a face.  I will hump anything.  I have a particularly special relationship going on with the Bay Tree in my backyard.  Hormones are weird.

Want me to do something? TREATS.  I like the wet stuff that makes your hands smell like headcheese.  One time my people put peanut butter on my nose and I pretended that my tongue was not long enough to get it off.  They felt really bad, so they gave me more treats.  Humans are easy.  I also like anything with hot dogs.  Thank you.

I will steal EVERYONE’s toys because I am a Golden Retriever.  That’s what the instructor lady said and I can get away with it.

Sometimes I pee when I get too excited.  It just happens.  It’s embarrassing.  Don’t make a big deal out of it.

When all the other dogs in class are behaving, I will not.  No one likes a follower.

You can try to put a harness on me.  I will escape.  They call me The Great Hound-dini.  I do birthday parties and bat mitzvahs.  Call my people to schedule.

My gums bleed.  I am teething.  Don’t panic.  I might start bleeding openly and all over the floor at times.  It’s cool.  It’s how we do it.

I am a lover, not a fighter…unless that German Shepard tries to steal my toys! Also, one time I killed a lizard. (and, I’d do it again.)

Chomping is my favorite.

I will smell the cat’s butt if it kills me.  I don’t know what will happen after that.  I haven’t gotten that far.

I will kiss you when you’re sad and snuggle you when you’re sick.

I get really excited.  I think you are the best.  All of you.  Every one of you.  Especially if you have TREATS!

OK, so obviously Emma didn’t write that herself.

You get a dog and things get weird.  You start to turn into that person that you previously made fun of.  I love her so much and I can’t hide it.  I would most likely (but, probably not…but maybe) purchase a crew neck sweatshirt featuring her face.  I have effectively written an entire blog post dedicated to, and in the voice of my dog.  It’s weird, but it’s honest.  This is where we are at right now.

If you are still reading this (Mom), thanks for bearing with me.  Also, I will put that sweatshirt on my amazon wish-list.   Christmas is sooner than you think.

Gin & Juice With Pomegranate and Lime

So, we did it.  We made it to the weekend.  *Clicking heels together!!*

Maybe you had a rough week.  Maybe you felt like you couldn’t get ahead.  Maybe you got egg yolk in your freshly washed hair…twice.  Maybe you made a holistic decision to try and cure your sinus headaches with peppermint oil.  Maybe you used too much.  Maybe you somehow managed to get that peppermint oil  not only UP your nose, but also all over your lips and in your eyes.  Maybe the only way to remedy the burning in this situation was to put Greek yogurt on a couple of Q-tips and shove the Q-tips up your nose.  Maybe (definitely) your dog insists on humping your leg if you look at her the wrong way.   The mother and daughter relationship starts to get weird. She’s five months now, and her hormones are flowing free.  You wish you could just leave a copy of “Are You There God, It’s Me Margaret” in her crate, but she never learned to read human.

Maybe this is just uniquely my week.  Maybe not.  I am sure you have had your very own set of trials, tribulations and TPS reports.

Either way, it’s the weekend.  The troubles of the week are over.  The peppermint oil has stopped burning the inside of my nose and the corners of my eyes.  There is no egg yolk in my hair  today (yet).  The dog will continue to hump me, but you can’t win em’ all right?   Things are looking up.

What do you say we have a cocktail together?  Yes?  Perfect.

I have just reunited with Gin.  My husband and I bought a bottle last weekend and both agree that it goes down nicely.  Flowery and smooth.

Here is the easy as pie cocktail that we concocted. (BTW, why do we say “Easy As Pie?”  Pie isn’t that easy. How about easy as a PB&J?)

You will need:

Ice

1 to 2 shots of Gin (It’s a Saturday.  No judgements.)

Juice of 1/2 a lime

Fill the rest of your glass with pomegranate soda.

Put all of your ingredients into a glass with plenty of ice. Stir it up.  Or Shake it in a shaker. No biggie.

Garnish with a lime wedge

Sip on your Gin and Juice

Crank up some music with a lot of bass

Have a dance party

CHEERS, FRIENDS!!  Have a fantastic Saturday.

Baked Risotto With Mushrooms, Sausage and Kale

Risotto has always been a finicky and time consuming dish for me.  No matter how much I dote over it, how much liquid I add, how much love I put into it, it never really tastes like that creamy bowl of wonderful that you order off of a restaurant menu.  It’s fussy.  I’m not so much into fussy, especially if the outcome can be kind of lackluster.   I had written myself off as the kind of gal that would not make a risotto.  It’s fine.  I’ll make pasta.

This all changed when I found this recipe from Joy the Baker.  Did you know that you can make risotto in the oven?  I didn’t.  It’s so low fuss, you will not even know what to do with your extra time.  Relax your stirring arm.  Have a glass of wine.  Kick up your heels and watch that last 30 minutes of Dawson’s Creek.  ( Don’t pretend you aren’t watching it.  It is currently on Netflix.  Do it. You will be dazzled by all of the Union Bay duds.  The dream of the 90′s is strong with The Creek.)

I originally made Joy’s recipe for a dinner party that I threw with my friend Becca.  I was skeptical.  What do you mean I don’t have to stir this?  No embarrassing sweat-stache as I stir and stir and stir?  I must be dreaming.

Sure enough, it worked, and it was a hot hit.  It might be a little intense to say that this changed my life, but that’s how I roll… a little intense.  It was life changing.  I CAN be that gal that makes risotto.

I knew for sure that I wanted to do this again, and this time add some really savory flavors to compliment the changing seasons.  I substituted the water in the recipe for white wine, and made that rice good and drunk.  I also added earthy mushrooms, a lemon, sage-flavored sausage and plenty of kale.

I knew it was a hit when my husband (while eating his first piece) asked me when I planned to make this again.  Always a good sign.

Go forth.  Relax your stirring arm.  No fuss.

Ingredients:

1 small onion finely chopped

1 tbs minced garlic

olive oil (enough to lightly cover the bottom of your pan)

1 package of sausage of your choosing (I used a lemon thyme flavor from my local organic farm, but I am sure this would be good with almost any type of sausage.)

32 ounces of chicken broth

2 cups of arborio rice

1 package of crimini mushrooms (chopped)

1 large bunch of kale (chopped)

1  1/4 cups white wine

1 cup grated parmesan cheese

butter for coating your pan

more parmesan cheese and a little thyme to garnish

salt and pepper to taste

Preheat your oven to 350 degrees.

In a medium-sized skillet, heat up your olive oil.  Add in your chopped-up onions and your garlic.  Saute them together until your onion becomes nice and translucent.  When the onions are translucent, add in your sausage.  Brown your sausage until no pink remains.  Add in your mushrooms and your kale and saute until all of the kale is wilted.  Add in some black pepper and a pinch of salt, whatever suits your taste.  Set the mixture aside.

In a separate bowl, mix together your uncooked rice, cheese and the sausage mixture.  Butter your baking dish (I used a 9 x 13).  Place this new rice mixture into the baking dish and spread out evenly.  Pour the stock and the water evenly over the rice mixture.

Place the dish into the oven on the middle rack.  Cook uncovered for 37-40 minutes.

Kick your feet up and wait for the magic.  Have some wine.  Catch up on the current 12 “Words with Friends” games that you are playing with your Grandma. Did I mention watching some Creek?  Or, be productive and make a salad.  Steam some broccoli.  The choice is yours.

 Make sure to stir it once (around the 20 minute mark) and then pop it back into the oven.  When the rice is done, all the liquid will be absorbed, and it should have a creamy texture.  If you feel your rice is still a bit crunchy, you can add more liquid in small increments (1/3 cup or so at a time) and cook until it is all absorbed.

When all of the liquid has absorbed, and you feel it has cooked through to your liking, remove the dish from the oven and allow to cool for 15 minutes.  After that, serve it up.  Add some parmesan, salt, pepper, thyme…make it your own.  Enjoy.   It is said to last up to 5 days in the fridge in an airtight container.  Don’t worry though, it won’t last that long.

Pumpkin Custard Cake With Chocolate Chunks| Gluten Free

So, the season is here!  The season where pumpkin is suddenly inserted into everything.  The pumpkin spice late is back.  You walk into the grocery store and are met with towers of canned pumpkin, strategically placed next to the whipped cream.  My pinterest board (as well of those of my friends) is full up with pumpkin cakes and cookies and carving methods.  I feel like I should almost be capitalizing it. PUMPKIN!!  Lets just scream it out. PUMPPPKINNN!!! Huzzah.

So, I am no different than all of you.  I may be going a bit pumpkin overboard.  You will be seeing a few posts from me using this glorious orange squash.  There might even be more than one type of pumpkin cake coming at you.  Too much?  Just go with it.  I have been slightly powerless to the displays of  this delightful seasonal treat.  They are everywhere.

This cake is super light and custardy, and should definitely satisfy an autumnal sweet tooth.

It goes really nicely with some whipped cream, and a sprinkle of cinnamon.

Pumpkin Custard Cake With Chocolate Chunks| Gluten Free

Ingredients

  • 1/3 cup coconut flour
  • 1/2 tsp baking soda
  • pinch of salt
  • 1 tsp cinnamon
  • 1/2 tsp pumpkin pie spice
  • 4 eggs
  • 1 cup of pumpkin
  • 1/3 cup maple syrup
  • 1/4 cup coconut oil
  • 1 cup chocolate chips

Instructions

  1. Preheat your oven to 350 degrees.
  2. Mix all of your dry ingredients (coconut flour, salt, baking soda, and spices) together in a food processor until they are well combined.
  3. Pulse in your pumpkin, eggs, coconut oil and maple syrup. Mix until it all comes together.
  4. Fold in your chocolate chips by hand.
  5. Put your mixture into a 9 inch buttered baking dish.
  6. Bake for 25-30 minutes. I would recommend checking it after 25 minutes. Put a toothpick or a fork into the center of your cake and when it comes out clean you are done.
  7. Cool.
  8. Serve.
  9. Stuff Face.
Schema/Recipe SEO Data Markup by ZipList Recipe Plugin
http://soletshangout.com/pumpkin-custard-cake-with-chocolate-chunks-gluten-free/

(Inspired by Elana’s Pantry)

Grammie’s Beef Stew | Gluten Free

If someone mentions making beef stew in my family, you are often met with song.

I was raised around my mother’s side of the family–a fantastically tight knit bunch of Hawaiians that love to get together hang out, talk story and feed each other.  Leave it to the Hawaiians to have a song about stew and kimchee and shoyu… but, we do.  It is a very catchy song too!

Don’t believe me, here you go… Hang in there, I know that it sounds like two Hawaiian guys just jamming out and singing something lovely, but wait until the English verse kicks in.  You’ve been duped.  It’s about food.

Is it stuck in your head now?  You’re Welcome.  Welcome to the family.

Needless to say, my Grammie makes the kind of beef stew that feels like a hug.  It is always so flavorful and comforting and homey.  My mom makes an equally lovely stew.  And now, I have my own version.  I’ve adapted it to be gluten free by using rice flour instead of the glutenous stuff.

Lets do this.

Grammie’s Beef Stew | Gluten Free

Ingredients

  • 1 medium sized onion
  • 4 carrots
  • 4 stalks of celery
  • mustard greens
  • 4 decently sized yukon gold potatoes
  • white rice flour
  • minced garlic
  • garlic powder
  • salt
  • pepper
  • 64 ounces of beef broth (2 cartons, or you can be fancy and make your own.)
  • tamari (gluten free soy sauce)
  • parmesan cheese for garnishing
  • olive oil
  • 2lbs stew beef

Instructions

  1. The first thing you are going to do is take out your faithful stew pot and heat up some olive oil over low heat (just enough to coat the bottom of the pan)
  2. While it is heating up, you can chop up your onion. Put the onion into the pot and saute it until it is nice and translucent. Add in a heaping spoonful of minced garlic. It will start to smell REAL good.
  3. Rinse off your stew beef and then pat it dry. Prepare a shallow dish with a mixture of rice flour and garlic powder. Place your stew beef into the mixture and coat each piece. When all of your beef is nice and coated, add it to the onion in the bottom of the pot and let it brown.
  4. Chop up your carrots, celery and potatoes and add them into the pot. Salt, pepper, and garlic powder those bad boys to your taste. I am a large believer in garlic. My Grammie likes to stress the importance of always using fresh AND granulated garlic. I trust her. You would too. Her food is amazing.
  5. After you saute it all around and mix it up a bit, add in your beef broth. At this time I like to put some soy sauce in there (just a little). Soy sauce you say? Yup. That's just how the Hawaiians do it.
  6. Now let that stew simmer for about 30 minutes.
  7. When you are about ready to serve, stir in your chopped up bunch of mustard greens. Let them simmer in there for a minute or two. They cook quickly.
  8. Now its ready. Put it in a bowl. Get grinding.I like to garnish mine with a little bit of freshly grated parmesan (that is from the Italian side of the family) If you are looking to make it really stick to your ribs hearty, serve it over some short grained white rice.And let me tell ya... this stuff is even better the next day!
Schema/Recipe SEO Data Markup by ZipList Recipe Plugin
http://soletshangout.com/grammies-beef-stew-gluten-free/

Lemon and Rosemary Air Freshener

Sometimes life doesn’t smell great.  Maybe you decided to have egg salad for lunch. Maybe you forgot to take the garbage out last night.  Maybe things just get a little funky. It happens. Maybe (definitely) you have one of these:

She’s beautiful.  You call her Emma.  She likes to roll in dirt.   She is funky.  So funky that she needs a bath.  Now you have a wet dog.  She thinks that your whole carpet is her towel.  She proceeds to rub herself on your carpet.  Double funky.  You hustle her outside to dry, and now deal with the smell.

You remember a pin you saw on pinterest.  It tells you to boil lemons and rosemary and some vanilla.  It claims that your home will suddenly smell like Williams  Sonoma.  You think this is better than your home smelling like a dog park.  You try it.  It’s awesome.   And easy.  Who doesn’t love easy?

Ingredients:

Water

2 Lemons

5 Sprigs of Rosemary

1 Tbs Vanilla

Fill a stock pot 2/3 of the way full with water.  Add in your sliced up lemons, rosemary and your vanilla.  Let it simmer on low all day long, adding extra water as needed.   Easy as that.

(Inspired by One More Moore)

Related Posts Plugin for WordPress, Blogger...