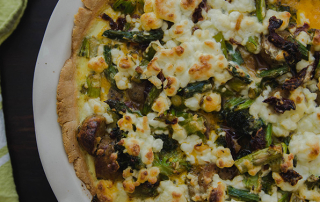
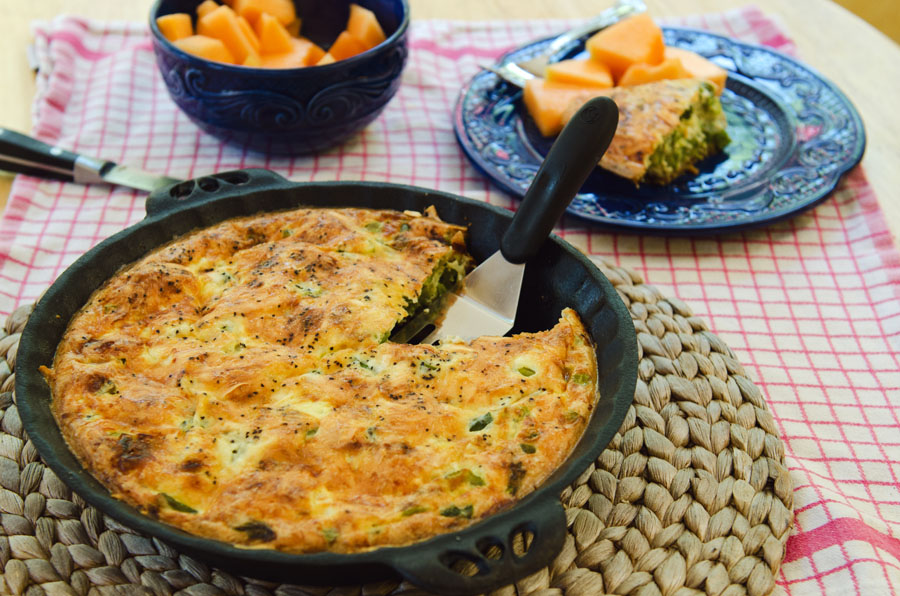
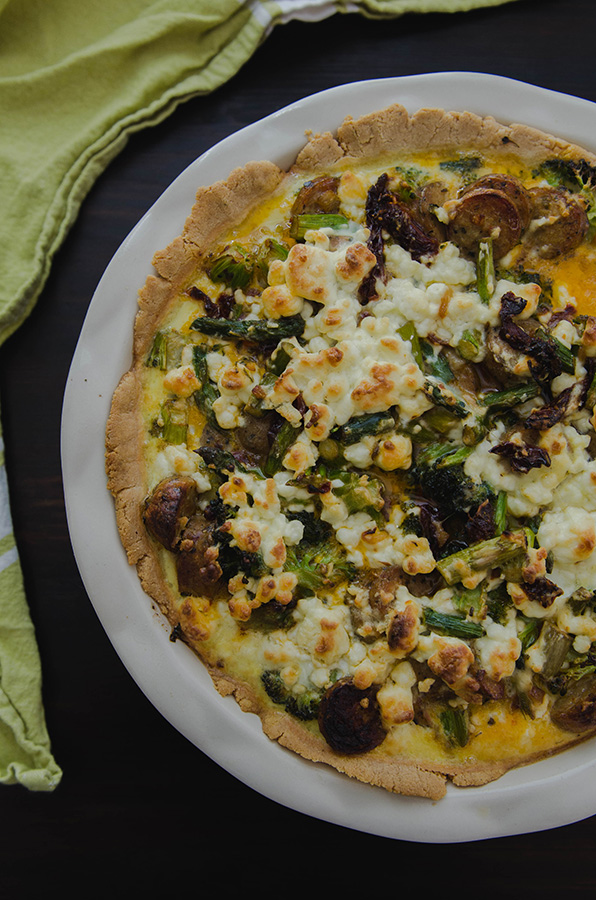
Buckwheat Waffles with Cinnamon Apples | Gluten Free

Buckwheat Waffle With Cinnamon Apples | Gluten Free // So...Let's Hang Out

Tomorrow is one of my favorite holidays.

It’s Steak and Lobster Day!

That’s right. Some people might refer to it as “Valentines Day,” but in this house we refer to it solely as Steak and Lobster Day. After a few years of going out to over-priced fixed menu dinners and suffering through people coming over to our tables and loudly serenading us with accordions or trying to sell us roses, we decided that we needed to go another route. One can only be serenaded by an accordion while eating overpriced lamb so many times. We started to notice that really good quality steak and lobsters were on sale at our local market during the Valentines madness. Jackpot. Thus was born Steak and Lobster day.

Buckwheat Waffle With Cinnamon Apples | Gluten Free // So...Let's Hang Out

In this tradition we get to wear sweatpants or fancy pants (it doesn’t matter we are at home…we don’t even have to wear pants at all… although, I do not recommend cooking without pants, no matter how sexy you think it’s going to be. Stuff splatters. We all learn our lessons). We eat an indulgent meal, usually dipping the lobster in some sort of butter bath.  We drink wine. We tell each other nice things. It’s a good tradition and one that I look forward to every year.

Buckwheat Waffle With Cinnamon Apples | Gluten Free // So...Let's Hang Out

Although it is usually just referred to as Steak and Lobster day, that doesn’t have to be the only special treat on the menu. What is that old saying? The way to a mans heart is through his stomach? That is true. I am sure my husband would still love me if I couldn’t make a mean meatball or didn’t bake him a confetti cake every year on his birthday… but, it certainly sweetens the deal.  It turns out that the most obvious way to my man’s heart is through his sweet tooth. He is Dutch. He grew up putting chocolate sprinkles on his toast. It all makes sense.

Buckwheat Waffle With Cinnamon Apples | Gluten Free // So...Let's Hang Out

Waffles are always a good move for a man with a sweet set of teeth. I also added some cinnamon apples to sweeten things up a little more. I’ve said it once and I’ll say it again, but fruit totally turns into something magic when you heat it up. Apples basically turn into pie filling. Hello. Delicious. The waffles manage to taste totally indulgent while remaining both gluten and dairy free! The apples cook down in coconut oil and release their natural sugars. Cinnamon joins the party and spices things up nicely! It’s the perfect sweet treat for your Valentine… er… Lobster… er… I don’t know what to call my husband on Steak and Lobster day. Will you be my Lobster-tine? Does that work? It’s a work in progress. Give me your thoughts.

Buckwheat Waffle With Cinnamon Apples | Gluten Free // So...Let's Hang Out

Real talk… I made these waffles that you see here while my husband was at work. I ate all of them.  I know that I am acting like I made them for him, and I totally have… but this batch was for me. It’s okay to be your own Lobster-tine sometimes too. You are special. You deserve it.  If you have no one to share your waffles with, be your own Waffle-tine. It is totally a thing. (okay…enough sticking “tine” on to the ends of words. I got the memo).

Buckwheat Waffle With Cinnamon Apples | Gluten Free // So...Let's Hang Out

XOXOX, Love Bugs!  Won’t you be my Waffle-tine? Okay. Really done now.

Buckwheat Waffles with Cinnamon Apples

Ingredients

    For The Waffles:
  • I cup buckwheat flour (I used Bob's Red Mill)
  • 1/2 cup almond meal
  • 1/4 cup white rice flour
  • 1/4 tsp salt
  • 1 tsp baking powder
  • 2 tbs coconut sugar (can be replaced with regular sugar)
  • 1 cup almond milk
  • 1/2 cup lite coconut milk
  • 2 large eggs
  • 3 tbs coconut oil
  • Maple syrup, to top
  • For The Cinnamon Apples:
  • 3 pink lady apples, peeled and chopped
  • 1 tbs coconut oil
  • 1/2 tsp cinnamon

Instructions

  1. Plug in your waffle iron and let it start heating up.
  2. Peel you apples and give them a course chopping.
  3. Heat your 1 tbs of coconut oil in a medium sized pan and then add in your apples. Add in your cinnamon and start to cook on low to medium heat. Keep stirring them occasionally so that they brown and caramelize on all sides.They are done when they become soft and have lightly browned.
  4. While your apples are heating up, start to prepare your batter. In a large mixing bowl, add in your dry ingredients and stir together until they are all thoroughly combined.
  5. In another bowl, whisk your eggs.
  6. Add in your coconut oil, almond milk and coconut milk to the egg mixture and whisk together until everything is mixed well.
  7. Add you wet ingredients to your dry ingredients and whisk. Whisk until a smooth batter forms. If your batter seems a little too thick, don't panic. Add in a little more almond milk. (I would add it in small increments, a tablespoon at a time.)
  8. Once your batter is completely whisked together, you can start making your waffles. Spray your waffle iron with non-stick spray. (I use olive oil spray from Trader Joes) and then ladle a 1/4 cup or a little more of your batter into your waffle iron.
  9. Cook your waffle until it is crispy on the outside.
  10. After you are done cooking your waffles, top them with some of the Cinnamon Apples and some maple syrup and enjoy!
Schema/Recipe SEO Data Markup by ZipList Recipe Plugin
http://soletshangout.com/buckwheat-waffles-with-cinnamon-apples-gluten-free/

Feta, Chive & Greek Yogurt Biscuits | Gluten Free

Feta, Chive & Greek Yogurt Biscuits | Gluten Free // So...Let's Hang Out

Confession:

These are the first biscuits that I have ever baked. Ever.

I wasn’t raised on biscuits. In fact, we never had them in our house. We were the family with the stash of Hawaiian sweet rolls. We occasionally baked those crescent rolls that came out of a can. Does that count? Probably not. Would it make a difference if I told you that sometimes we would roll mandarin oranges up into the crescent roll dough to make them fancy? No? Ok, fine. I will stop trying to impress you with my childhood culinary prowess.  I wasn’t exactly the Doogie Howser of baking, but I had dreams.

This week I found myself craving something savory and bread-y. When I found this recipe for Joy The Baker’s Feta, Chive and Sour Cream Scones, it was game over. I knew I wanted to try to make them gluten free. What was the worst that could happen? Not much. Honestly, if you put enough butter and cheese into something it’s usually an automatic culinary win. However, there was a chance (as there always is with gluten free baking) that my buttery biscuits would end up being buttery-rock-hard-nuggets-of-terror. (Honestly, have you ever picked up a loaf of rice bread at the store? It’s heavy.Weaponry, if you will). For this reason, I added in some almond meal to keep them moist and light and then crossed my fingers.

Look at all that butter though. You can see a little chunk peeking through. That looks hopeful.

Feta, Chive & Greek Yogurt Biscuits | Gluten Free // So...Let's Hang Out

For all of you who think that my baking process is more scientific, you can imagine me doing this all very methodically in a lab coat. Imagine beakers and baking scales. Imagine a graphing calculator (why?).

Ok, now stop.

Remove the lab coat, the baking scale, the weird graphing calculator and add in a couple of measuring cups, a mixing bowl, too much butter, a little bit of know-how and whole lot of luck. Did I mention the biscuit dough on my glasses? How about the mason jar ring that I used to cut out the biscuits since I couldn’t find my cookie cutters? Highly scientific. Yup.  Biscuit-Chic and totally resourceful. Girl scout-style.

Feta, Chive & Greek Yogurt Biscuits | Gluten Free // So...Let's Hang Out

I egg-washed the tops so that they would get deliciously golden brown, and sprinkled them with a little bit of fresh cracked pepper and paprika and then in the oven they went. Fingers still crossed.

Feta, Chive & Greek Yogurt Biscuits | Gluten Free // So...Let's Hang Out

When I pulled the biscuits out of the oven the smell was intoxicating. They were golden brown and appeared to be flaky. What wizardry was this? I totally pulled off a delicious gluten-free biscuit. I broke one in half. There were chunks of warm and fragrant feta cheese running throughout. I bit into it. Buttery, a slight tang from the Greek yogurt with the herbaceous punch of the chives shining through. Heaven.

Feta, Chive & Greek Yogurt Biscuits | Gluten Free // So...Let's Hang Out

I insist that you bake these this weekend and eat a couple of them while they are warm out of the oven. This is the stuff that weekends are made for.

Ingredients:

2 1/2 cups gluten-free flour blend (I used Bob’s Red Mill All Purpose Gluten-Free Flour)

1 cup almond meal

1 1/2 tsp xanthan gum

1 tbs coconut sugar (you can sub. regular sugar if you have no coconut sugar on hand)

2 1/2 tsp baking powder

1/2 tsp baking soda

1/2 tsp salt

1/2 tsp cracked black pepper

3/4 cup cold unsalted butter, cut into cubes

1 egg, beaten

3 tbs ice water

3/4 cup non-fat greek yogurt

1/2 cup chives, chopped

3/4 cup feta cheese, crumbled

1 egg beaten for the egg wash

black pepper, sea salt and paprika to top biscuits

Preheat your oven to 400 degrees and place your oven rack in the upper third of the oven.

Line two baking sheets with parchment paper and set them aside.

In a large mixing bowl, sift together your dry ingredients. Flour, almond meal, xanthan gum, sugar, baking powder, salt, baking soda and black pepper.

Using your fingers (or a pastry cutter) mix in your cold cubes of butter. Mix together until it resembles a course meal.

In another bowl, mix together your Greek yogurt, egg and water. Beat together lightly. Add this  mixture to your dry ingredients and stir until it resembles a shaggy dough mixture.

Add in your feta, and your chives. Dump your dough on a clean surface and prepare to knead. I used a baking sheet for the process and it worked out just fine. A clean counter or table would also work well.

Knead together your mixture, incorporating the chives and feta into the mixture. It should come together in about 10 to 15 kneads.

Using your hands, pat out your dough into a sheet that is approximately 1 inch thick. You could also use a rolling pin, but I found it easier to just use my hands.

Cut out your biscuits into your desired shapes. Joy recommends a 2 inch round biscuit cutter. Like I told you before, I got real un-fancy and used the ring of a mason jar. It totally worked.

Once you have cut out your biscuits, place them onto your parchment lined baking sheets.

In a separate bowl, beat an egg and brush this beaten egg onto the each biscuit. Sprinkle with sea salt, black pepper and paprika.

Feta, Chive & Greek Yogurt Biscuits | Gluten Free // So...Let's Hang Out

Bake for 12-15 minutes or until they are delightfully golden brown. I found mine took about 13 minutes in the oven.

They are best served warm and eaten the day they are made!  If you can’t get through them all in a day (understandably), they will last for about two days after they are made :)

I scarfed down a few with some salad and carrot ginger juice. Delish. My husband cut one open the next morning and topped it with an egg. Super delish.

Feta, Chive & Greek Yogurt Biscuits | Gluten Free // So...Let's Hang Out

Happy biscuit baking, friends! It’s totally almost the weekend. :)

(Adapted from Joy The Baker)

Pear, Pecorino & Chard Tartlets | Gluten Free

Pear, Pecorino & Chard Tartlets | Gluten Free // So...Let's Hang Out

One of my favorite birthday gifts this year was Aran Goyaga’s cookbook Small Plates and Sweet Treats. Aran is the beautiful mastermind of the food blog  Cannelle et Vanille. It’s so gorgeous I can’t even handle it. Every single one of her photographs makes me want to jump into them, taste the food, and experience the lovely warm and bright atmosphere that she creates. She makes gluten-free food look decadent and chic. Can you tell I love her? Yes. I do. Gush, gush, gush.  She is major.

One of the recipes in the book that caught my eye immediately was her Swiss Chard, Pear & Gruyere Tart. However, true to form, I did not have a lot of what the recipe called for. My fancy gluten-free flour supply was rather low, but I did have almond meal.  I scoured the pantry and my fridge looking for other things that could make it work! You can’t stop a girl on a mission to make a tart. It’s just not possible.

I started off with my trusty almond meal crust. Since it’s made with almonds, it has a buttery and rich taste even though the recipe contains no butter. I, against my better judgement decided to make four tartlets when I should have made five.  You should make five. It gets messy when you make four. You’ll see.

Pear, Pecorino & Chard Tartlets | Gluten Free // So...Let's Hang Out


You saute your veggies with white wine and olive oil. You whisk together eggs and cheese and coconut milk. You slice up your pears and shred more cheese. It’s a sexy process.

Pear, Pecorino & Chard Tartlets | Gluten Free // So...Let's Hang OutOnce your tart shells have cooled you assemble them layering your chard mixture first and then your pears.

pearandchardtarts-7277blog

Then comes the custard mixture! Pour it evenly into each tartlet and sprinkle with more cheese.

Pear, Pecorino & Chard Tartlets | Gluten Free // So...Let's Hang Out

Whoops. Yup, you should have made five tarts. Smooth move, Gina. Nobody is perfect, eh?

I cleaned them up nicely, transferred them to a new baking sheet and let the oven do its magic.

Pear, Pecorino & Chard Tartlets | Gluten Free // So...Let's Hang Out

And what magic it was! Voila! You just got certifiably fancier. This is one heck of a brunch if I do say so myself. Your friends will be impressed. I think that it’s a general rule that when you marry pears with cheese and bake them into something, people think you are pretty impressive. Perhaps this is just me being slightly impressed with myself. Either way… high five. If you aren’t the tartlet type, you could simply make it into one nine inch tart. No bigs.

Let’s get tarty.

Tart Crust Ingedients:

1 1/2 cups almond meal

1/4 tsp baking soda

1/2 tsp salt

1/4 cup grapeseed oil

2 tablespoons maple syurp

Tart Filling Ingredients:

2 tablespoons olive oil

1 leek, sliced

2 cloves of garlic, minced

4 cups rainbow chard, chopped

2 tbs white wine

salt, pepper, and nutmeg (to taste)

2 eggs

1 tablespoon cornstarch (or sweet rice flour)

1/2 cup evaporated milk

1/2 cup lite coconut milk

1 1/2 cups finely grated Pecorino Romano cheese

1 medium pear, thinly sliced with a mandoline

Preheat your oven to 350 degrees.

Grease five tartlet pans.

Combine your almond meal, baking soda, salt and stir it up.

Whisk together your maple syrup and your grapeseed oil and then add it into your almond meal mixture.

Mix together until all of the ingredients are wet and thoroughly combined.

Using clean hands, divide up the mixture evenly between five tartlet pans. Press the dough into the pans until the whole bottom surface is covered.

Place on a baking sheet and bake for 7-10 minutes or until they’re golden brown.

Allow them to cool completely before filling.

Turn the heat on your oven up to 375 degrees.

While your tart crusts are cooling, start on the tart filling.

In a large saute pan, heat up your olive oil. Add in your leek and your garlic and cook until they are both tender.

Add in your white wine, and rainbow chard. Stir. Add in a dash of salt, pepper, and some nutmeg. Cook down until all of the chard has wilted and most of your liquid has evaporated. Set the mixture aside.

In a medium sized bowl, whisk together your eggs, coconut milk, evaporated milk, cornstarch and a little over half of the cheese that you have grated. Add some salt and pepper to your egg mixture and whisk again.

Fill up your cooled tartlet crusts with the chard mixture, add slices of pear to the top. Lightly press your filling down with a spoon and then pour the custard over the top of each tartlet.

Top the tartlets with the remaining portion of cheese so that a nice crust will form while baking. Sprinkle a little more nutmeg on top and pop them in the oven.

Bake at 375 degrees for 25 minutes, or until the tarts become a lovely golden brown.

Allow them to cool slightly before serving.

Dig in! Marvel at your total fanciness. Happy Weekend Brunching! xo

Pear, Pecorino & Chard Tartlets | Gluten Free // So...Let's Hang Out

(Recipe adapted from Small Plates and Sweet Treats)

If You Like It Then You Should Have Put An Egg On It…| A Brunch Time Recipe

My husband has some solid beliefs when it comes to food.  His philosophy is strongly sandwich-based.  He believes that everything can be made into a sandwich. This has become such a thing in my family that I find myself texting my brother pictures of meals that my husband has turned into sandwiches. He is famous for it. In fact,  I have caught him daydreaming before while we are driving around and doing Sunday errands.  I asked him  ”Hey Hun, what are you thinking about?” to which he replied “I was just dreaming about a sandwich that I am going to make when we get home.  It has ham and salami and an egg on it.  Ooooh, and cheddar.”

He is a dreamer, what can I say.  He believes in breakfast.  He believes that everything is better with an egg on it.  I cannot entirely disagree with him.  Put an egg on almost anything and you got yourself a brunch.

*Note :I do not endorse putting eggs on anything with peanut butter or jelly. Or anything containing tuna fish.  Lessons learned.  Yes, that really happened in this house, my husband felt even a tuna melt could use an egg. It can’t. Take our advice, especially on the tuna fish.  That was rough.*

Here is a nice little brunch that I whipped up using last week’s chard and cashew pesto!  A healthy helping of wilted greens topped with pesto-covered roasted potatoes.  Throw in some sun-dried tomatoes, and for goodness sake, slap an egg on it!  A lovely brunch for two.

Ingredients: 

6 small Yukon gold potatoes, cubed

2 tbs olive oil

Salt, pepper, garlic (to taste)

1 bunch of rainbow chard

1/4 cup of chicken broth (or veggie broth to make it vegetarian)

3 tbs chard and cashew pesto

1/4 cup sun-dried tomatoes

2 eggs

Preheat your oven to 400 degrees.

Wash and cube your potatoes.  Coat them in olive oil and spice them with salt, pepper and granulated garlic to taste.  Lay them out on a baking pan covered in aluminum foil.  Bake them for 20-25 minutes or until they are soft inside and beginning to get crispy on the outside.

While your potatoes are cooking, wash and cut your chard.  Heat some olive oil up in your pan over medium heat and then drop in your greens.  Begin to cook down.  Add in your chicken broth and continue to cook down over a medium to low heat until they are lightly wilted but still remain vibrant and green.

After your potatoes are done cooking, put them into a bowl and mix in your pesto.  Stir your potatoes until the pesto has completely covered them.  Add in your sun died tomatoes and give them another stir.

Once your potatoes are all done, you can cook your eggs.

Prepare two eggs.  I think this meal pairs best with over-easy eggs.  The runny yolk is a nice addition to the crispy and flavorful potatoes.

Plate your meal.  Chard, potatoes and an egg on top.  Yum!

Enjoy.

Fantasize about the next meal you can put an egg on.  If you like it then you should totally put an egg on it…

Is it weird that I have been singing those lyrics to the tune of Beyoncé’s” Single Ladies” since I made this recipe?  Maybe chasing my husband around the house doing the dance that she does in the video? (particularly the section where the does the whole punching and moving forwards move…)  I regrettably do not have the black leotard or the fiercely baby-oiled haunches. Real life.  It can be awkward.


Chocolate Bread Pudding | Gluten Free

I have a confession to make.  I have never eaten bread pudding before making this one.  All of those years of gluten eating, and bread pudding never made it on my radar.  It wasn’t until my husband ordered something called ” Chocolate Croissant Bread Pudding” at our local bakery that my ears perked up.  It sounded amazing. I watched him eat it with a sense of gluten eaters envy.  That doesn’t happen too often anymore, since I am SO used to being gluten-free… but there he was eating this melty pot of flakey chocolate and butter and there I was eating yogurt.  It was a moment.  I felt an injustice and it had to be righted.

I have no basis for how a bread pudding tastes.  I didn’t really know what went in it.  I assumed.  I didn’t even do a google search.  This could have gone poorly. I will admit that I have a tendency to fly by the seat of my pants in the kitchen.  A dash of this and a dash of that.  I am not great a measuring things.  I keep on having to remind myself to write things down now that I am blogging and sharing things with you lovelies! That’s just how I learned to cook.  I call it the “Put Some” method.  Every time my Grammie or my Mom would give me a recipe and I would ask them “Wait…how much garlic?” or “How much shoyu?” they would always tell me “Oh, you know…just put some!”  So there it is.  My general philosophy in the kitchen.  Just put some.  Cooking by feeling it out.

I surveyed my pantry and my fridge.  I did not have gluten-free croissants (If you have some of these, please bring them to me immediately. Thank you.) However, I did have a trusted loaf of UDI’s bread.  That’ll do.  I had chocolate in the form of chocolate chips.  I had eggs.  I had cinnamon.  I had vanilla almond milk.  I had vanilla extract.  Those things sounded like they would do just fine.  I figured since there is only the two of us (plus two very furry children who should definitely not be eating chocolate) that we only needed to make a very small pan of this.  If we made a big pan I would probably gorge myself on it.  It would lead to a sugar mania followed by the inevitable sugar crash which includes me passed out in a puddle of my own tears.  Not an ideal way to spend a Saturday   For our wedding we had gotten a set of pretty Emile Henry pans and one of them was a 9 by 5.7 inch baker.  Perfect. If you want to make more of this just double, triple, the recipe…or do as I do and just put some. :)

Let’s start putting…


Ingredients:

5 slices of UDI’s gluten free bread

2 eggs

1/2 cup vanilla almond milk

1/3 cup chocolate chips

1 tsp cinnamon

1 tbs vanilla extract

Butter (for greasing the pan, plus 1 tbs for on top)

This recipe will make enough for two.  Or, maybe four.  It depends on how hungry of a hippo you are.  I tend to be a hungry hungry hippo in the morning.

Preheat your oven to 350 degrees.

Chop your UDI’s into cubes and lay them out flat on a baking sheet.  When your oven had heated up, put your tray of bread cubes in the oven and lightly toast them. It won’t take long.  Check on them after two minutes.  If they are not toasting evenly give them a stir with a spatula and let them continue toasting a little longer.

Once your bread is toasted, remove it from the oven and set aside.

Crack your eggs in a small mixing bowl and whisk them together well.  Add in your almond milk, cinnamon and vanilla extract.  Whisk until all ingredients are combined thoroughly.

Grease your 9 by 5.7 inch pan with butter.

Place your toasted bread cubes in your 9 by 5.7 inch pan.  Pour your egg and milk mixture over the top.  With your clean hands mix the bread and the egg mixture together so that all of the pieces are coated.  This is a good time to assess if you have enough liquid.  If the mixture looks too dry add a tad bit more almond milk and then mix it again.  I would only add almond milk in very small increments.  Gluten-free bread isn’t as forgiving as regular bread and does better with a little less liquid.

Add in your chocolate chips and mix it up again.

Just before baking, take a tbs of butter, cut it into a few little cubes and place them evenly on top of your bread and egg mixture.

Pop it in the oven for 25 to 30 minutes.  It is done when the egg mixture is no longer runny and it has a beautiful golden brown crust on top.

Congratulations! There is no longer a bread pudding injustice.  Take that, yogurt.

Wishing you all a fabulous Friday!

Related Posts Plugin for WordPress, Blogger...