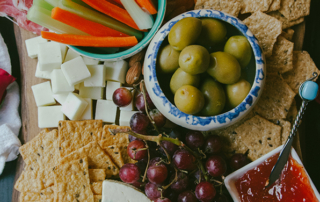
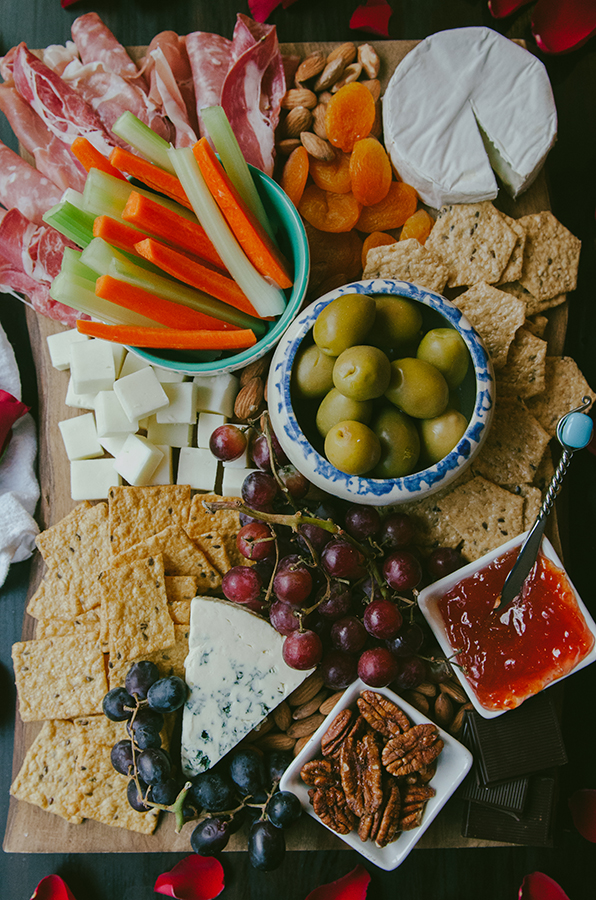
Crustless Kale & Feta Quiche With Greek Yogurt

Crustless Kale & Feta Quiche With Greek Yogurt | So... Let's Hang Out

I am back. I can breathe out of my nose. It basically feels like the first day of spring. I want to click my heels and dance with my hands waving in the air. I want to do jumping jacks.  I want to bake cookies. I want to do anything that is not struggling to breathe while lying on a couch and watching terrible daytime programming. I want to eat anything but chicken soup. If I eat anymore chicken soup, I fear I will actually transform into a chicken. This would make my cooking/blogging life difficult. Wings don’t have thumbs, making it very hard to type and even harder to lift things like pots or baking sheets.

Enough of that. I haven’t left the house for more than ten minutes at a time in the last six days. Forgive all preposterous declarations of what life would be like if I was indeed a blogging chicken. It would be hard, that’s all I am sayin’.  Also, I would probably not make you things like quiche. Chickens don’t eat quiche. Aren’t you happy I am not a chicken?

Crustless Kale & Feta Quiche With Greek Yogurt | So... Let's Hang Out

This is probably no secret by now, but I tend to cook with what I have on hand. I am not much of a planner in my day to day cooking life. My Mom came to visit a few weeks back, and I wanted to make her a nice breakfast. Moms totally deserve nice breakfasts. When I looked in my fridge, I saw the usual suspects: Kale, Eggs, Cheese.  The only thing standing between me and a fabulous quiche was milk. I stared at the vanilla almond milk we keep on hand and considered it. (I once made mac and cheese with vanilla almond milk. You can gag now. I did.) Nope. That will not do. Coconut milk? Nope. I then spotted some Greek yogurt. Hmmm… why not? It was totally worth a try. If It didn’t work out there was always granola.

I sauteed onions and garlic with kale and stewed tomatoes. Holy yum!

Crustless Kale & Feta Quiche With Greek Yogurt | So... Let's Hang Out

I beat eggs into greek yogurt until it became almost fluffy. I put the sauteed kale into a cast iron baking dish with crumbled feta.

Crustless Kale & Feta Quiche With Greek Yogurt | So... Let's Hang Out

Then there was cheese on cheese. Grating some fresh pecorino on top assures that you will get a nice golden crust.

Crustless Kale & Feta Quiche With Greek Yogurt | So... Let's Hang OutSee? I promised.

Crustless Kale & Feta Quiche With Greek Yogurt | So... Let's Hang OutNow it was time for the moment of truth… the tasting. I took a bite thinking “Please let this be better than vanilla almond milk!”

Crustless Kale & Feta Quiche With Greek Yogurt | So... Let's Hang Out

HOLY EGGS! It was delish. Greek yogurt really does its thing in this quiche. It brings a little bit of a welcome tartness to the dish and helps those eggs stay really light and fluffy!  Basically, I am a genius (on accident…per usual). Everyone had a couple of pieces. Mom was happy. Bellies were full. I am not a chicken. End of story. Ta-daaa!

Disclaimer: The nice people at Chobani sent me some of their product for recipe testing and development. However, all opinions are my own.

Crustless Kale & Feta Quiche With Greek Yogurt

Ingredients

  • Olive Oil, enough to coat a pan
  • 1 bag of kale (or one bunch, chopped)
  • 1 medium onion, chopped
  • 4 cloves of garlic, minced
  • 1/4 cup chicken broth (veggie broth can be substituted)
  • 1 14oz can of vine-ripened tomatoes, drained
  • 6oz Greek Yogurt (I used Chobani 0% Plain Nonfat)
  • 5.25 oz sheep's milk feta, coarsely chopped
  • 5 eggs
  • Grated pecorino romano cheese, to top
  • Salt and pepper, to taste

Instructions

  1. Preheat your oven to 350 degrees
  2. Prepare all of your veggies by washing, chopping and mincing.
  3. In a large saucepan, heat up some olive oil over medium heat.
  4. Once your olive oil is heated, add in your onions and your garlic and saute until translucent.
  5. Add in your kale and begin to saute. If it is having some trouble wilting, you can add in your broth. Cover it and cook down for a couple of minutes.
  6. Once your kale leaves have begun to wilt, you can add in your can of drained tomatoes and stir. Allow to cook together for a couple of minutes with the lid off, stirring occasionally.
  7. Turn the heat off on your burner and add your chopped up feta to your kale mixture. Stir it all together until everything is evenly combined.
  8. Put your kale mixture into a greased baking dish. I used a 9 inch cast iron pan.
  9. Add your yogurt to a medium sized bowl. Crack your five eggs into the same bowl and whisk together until there are no lumps and the eggs are fluffy and thick. If your eggs are not liquid enough add in a tiny splash of water and continue to whisk until it is mixed through.
  10. Add your egg mixture on top of your kale mixture in the baking dish. With a fork, move around some of the kale mixture so that the egg mixture can seep into the entire dish and does not sit on top.
  11. Salt and pepper the top of your quiche.
  12. Grate some pecorino romano directly on top of your quiche so that the entire top of the quiche has a light layer of cheese covering it.
  13. Bake for 35-40 minutes. Check on your quiche periodically. It is done when the top is golden brown. When you cut into the center it should be dry and void of liquid egg mixture. If there is still liquid, continue to bake it, checking on it every couple of minutes.
  14. Serve and enjoy!
Schema/Recipe SEO Data Markup by ZipList Recipe Plugin
http://soletshangout.com/crustless-kale-feta-quiche-with-greek-yogurt/

Pear, Pecorino & Chard Tartlets | Gluten Free

Pear, Pecorino & Chard Tartlets | Gluten Free // So...Let's Hang Out

One of my favorite birthday gifts this year was Aran Goyaga’s cookbook Small Plates and Sweet Treats. Aran is the beautiful mastermind of the food blog  Cannelle et Vanille. It’s so gorgeous I can’t even handle it. Every single one of her photographs makes me want to jump into them, taste the food, and experience the lovely warm and bright atmosphere that she creates. She makes gluten-free food look decadent and chic. Can you tell I love her? Yes. I do. Gush, gush, gush.  She is major.

One of the recipes in the book that caught my eye immediately was her Swiss Chard, Pear & Gruyere Tart. However, true to form, I did not have a lot of what the recipe called for. My fancy gluten-free flour supply was rather low, but I did have almond meal.  I scoured the pantry and my fridge looking for other things that could make it work! You can’t stop a girl on a mission to make a tart. It’s just not possible.

I started off with my trusty almond meal crust. Since it’s made with almonds, it has a buttery and rich taste even though the recipe contains no butter. I, against my better judgement decided to make four tartlets when I should have made five.  You should make five. It gets messy when you make four. You’ll see.

Pear, Pecorino & Chard Tartlets | Gluten Free // So...Let's Hang Out


You saute your veggies with white wine and olive oil. You whisk together eggs and cheese and coconut milk. You slice up your pears and shred more cheese. It’s a sexy process.

Pear, Pecorino & Chard Tartlets | Gluten Free // So...Let's Hang OutOnce your tart shells have cooled you assemble them layering your chard mixture first and then your pears.

pearandchardtarts-7277blog

Then comes the custard mixture! Pour it evenly into each tartlet and sprinkle with more cheese.

Pear, Pecorino & Chard Tartlets | Gluten Free // So...Let's Hang Out

Whoops. Yup, you should have made five tarts. Smooth move, Gina. Nobody is perfect, eh?

I cleaned them up nicely, transferred them to a new baking sheet and let the oven do its magic.

Pear, Pecorino & Chard Tartlets | Gluten Free // So...Let's Hang Out

And what magic it was! Voila! You just got certifiably fancier. This is one heck of a brunch if I do say so myself. Your friends will be impressed. I think that it’s a general rule that when you marry pears with cheese and bake them into something, people think you are pretty impressive. Perhaps this is just me being slightly impressed with myself. Either way… high five. If you aren’t the tartlet type, you could simply make it into one nine inch tart. No bigs.

Let’s get tarty.

Tart Crust Ingedients:

1 1/2 cups almond meal

1/4 tsp baking soda

1/2 tsp salt

1/4 cup grapeseed oil

2 tablespoons maple syurp

Tart Filling Ingredients:

2 tablespoons olive oil

1 leek, sliced

2 cloves of garlic, minced

4 cups rainbow chard, chopped

2 tbs white wine

salt, pepper, and nutmeg (to taste)

2 eggs

1 tablespoon cornstarch (or sweet rice flour)

1/2 cup evaporated milk

1/2 cup lite coconut milk

1 1/2 cups finely grated Pecorino Romano cheese

1 medium pear, thinly sliced with a mandoline

Preheat your oven to 350 degrees.

Grease five tartlet pans.

Combine your almond meal, baking soda, salt and stir it up.

Whisk together your maple syrup and your grapeseed oil and then add it into your almond meal mixture.

Mix together until all of the ingredients are wet and thoroughly combined.

Using clean hands, divide up the mixture evenly between five tartlet pans. Press the dough into the pans until the whole bottom surface is covered.

Place on a baking sheet and bake for 7-10 minutes or until they’re golden brown.

Allow them to cool completely before filling.

Turn the heat on your oven up to 375 degrees.

While your tart crusts are cooling, start on the tart filling.

In a large saute pan, heat up your olive oil. Add in your leek and your garlic and cook until they are both tender.

Add in your white wine, and rainbow chard. Stir. Add in a dash of salt, pepper, and some nutmeg. Cook down until all of the chard has wilted and most of your liquid has evaporated. Set the mixture aside.

In a medium sized bowl, whisk together your eggs, coconut milk, evaporated milk, cornstarch and a little over half of the cheese that you have grated. Add some salt and pepper to your egg mixture and whisk again.

Fill up your cooled tartlet crusts with the chard mixture, add slices of pear to the top. Lightly press your filling down with a spoon and then pour the custard over the top of each tartlet.

Top the tartlets with the remaining portion of cheese so that a nice crust will form while baking. Sprinkle a little more nutmeg on top and pop them in the oven.

Bake at 375 degrees for 25 minutes, or until the tarts become a lovely golden brown.

Allow them to cool slightly before serving.

Dig in! Marvel at your total fanciness. Happy Weekend Brunching! xo

Pear, Pecorino & Chard Tartlets | Gluten Free // So...Let's Hang Out

(Recipe adapted from Small Plates and Sweet Treats)

Related Posts Plugin for WordPress, Blogger...